
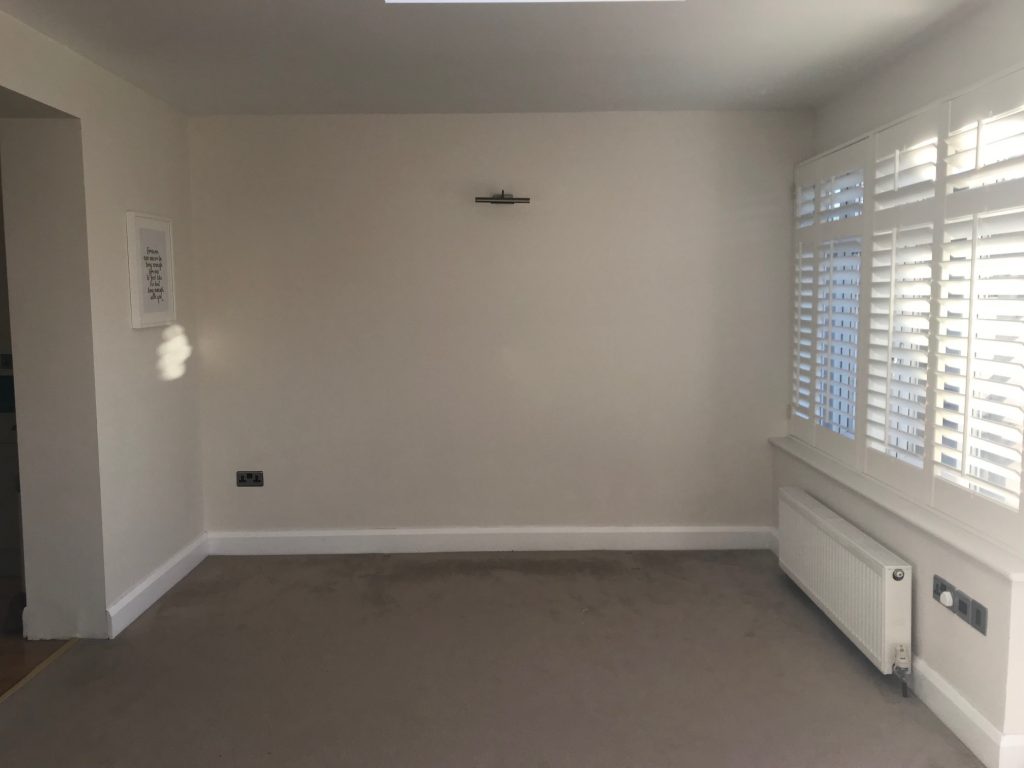
Our living room space is a bit of an odd shape in that it spreads across the entire width of the house meaning it’s incredibly long, plus the front is entirely made up of glass & big french doors. This means that designing the space (& the need for two sofas!) becomes tricky & realistically, to make the space ‘flow’ the current layout of the two sofa’s facing one another & the TV on the middle wall is the only way it would work.
This however means that both sides behind the sofa become a bit wasted & I’ve been wondering how to bring more character in to this extension (previously a leaking conservatory which we turned in to an extension, you can read about here) part of the house, something I love so much about the main house dating back to 1882.
I loved the idea of creating a reading area space & then when the cold weather started kicking in a couple of months ago the idea of a fireplace came in to my head. Much to Mr The Home That Made Me’s dismay as we all know what happens when Charlotte gets an interior urge…..
Thought number 1 was to put a log burner where the TV is. After consulting with some fitters I was told that I’d need to bring the wall out a substantial amount which would then mean that it would make the room an even odder shape & we’d quite literally have to squeeze past the arms of the sofa to go & sit down. I also got told about the maintenance & safety issues surrounding log burners & children which I have to admit did put me off.
I loved the idea of cosying up under a fluffy blanket with a cup of tea & a crackling fire so in true THTMM fashion, I didn’t let this small set back come in the way between my interior goal.
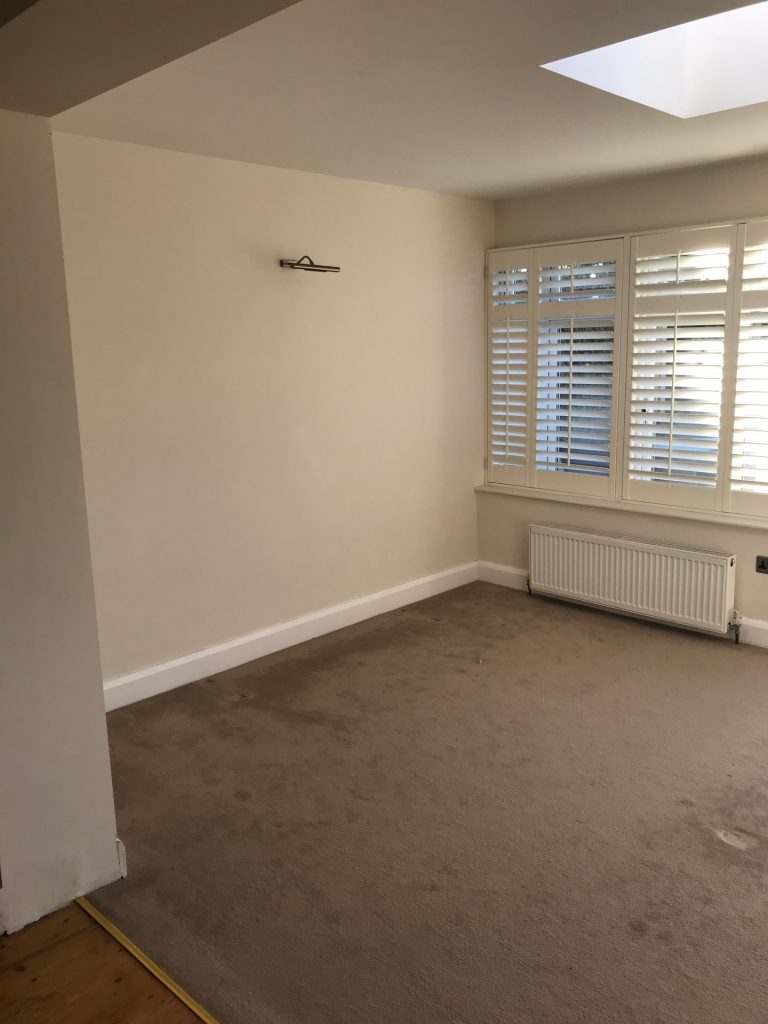
The next idea was to incorporate the idea of a reading area next to a fireplace – somewhere I could curl up in with a good book by the fire. I did a little poll on Instagram stories asking all of your opinions & also had my lovely friend Lucy, one of the interior designers over at mybespokeroom.com to have a play around with the layout after sending over some measurements. It became clear that the left hand wall (where the console table used to be) would be the best space to incorporate this.
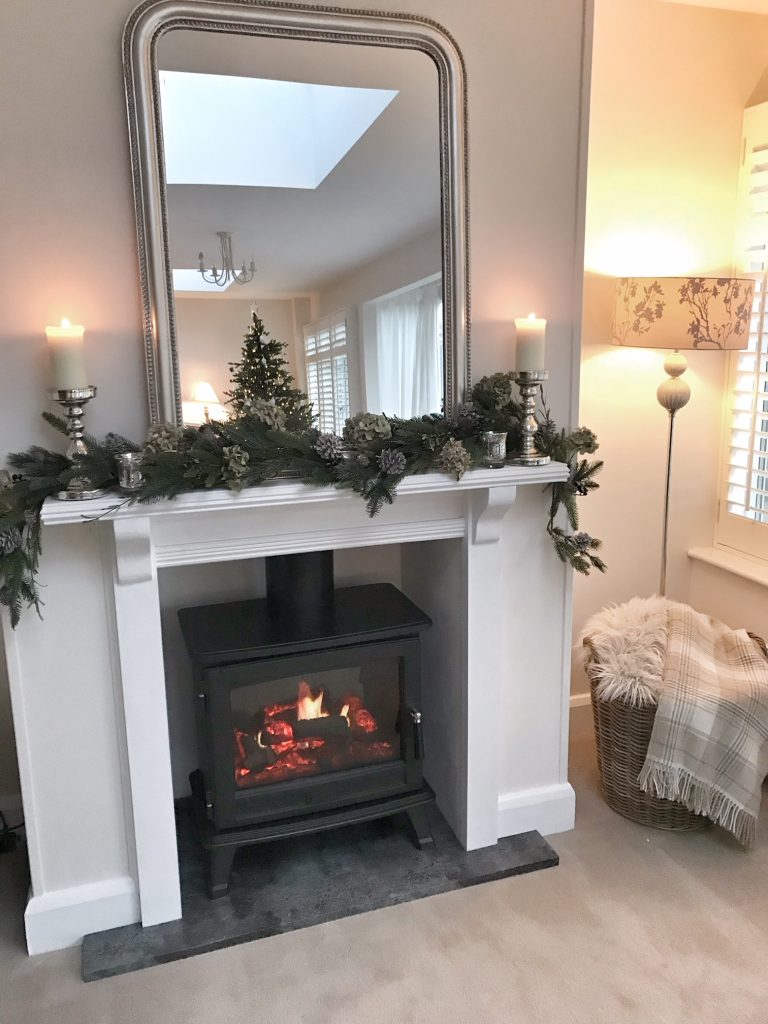
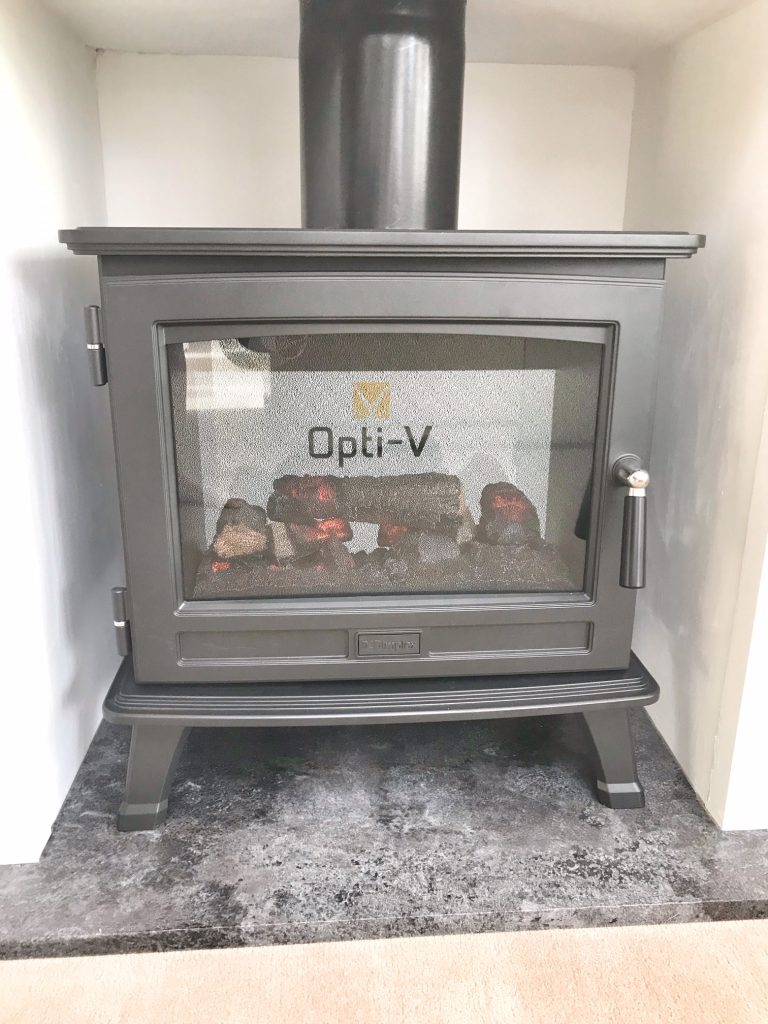
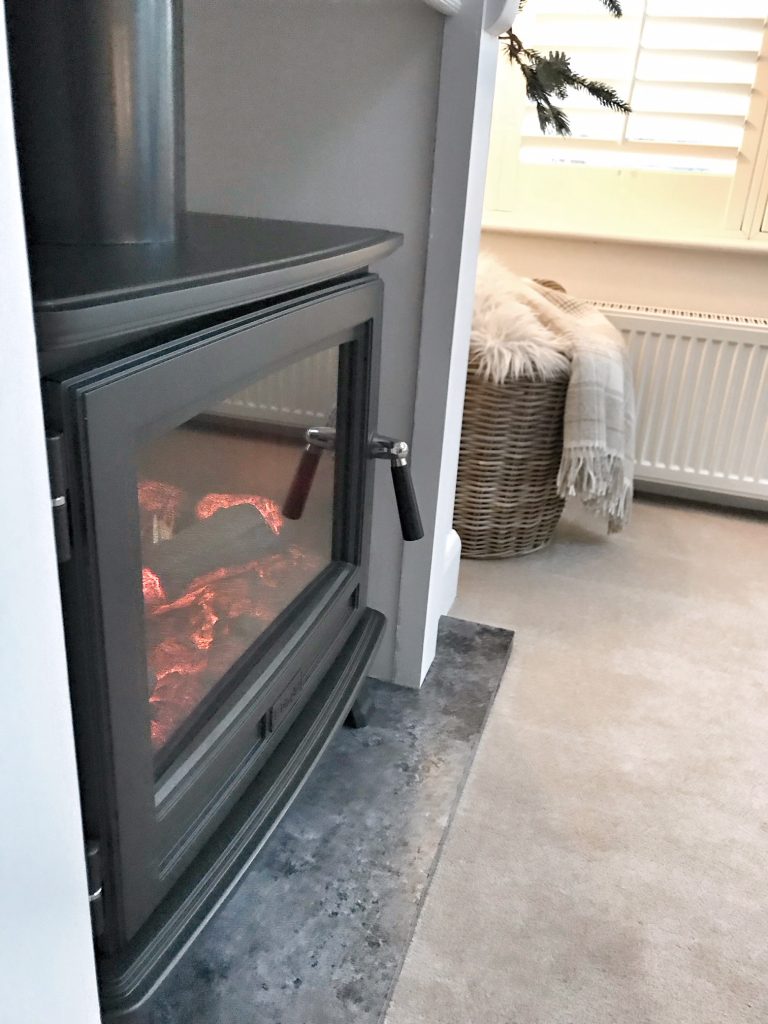
Initially I was going to mount a fireplace on to the flat wall, but sometimes think this can look a bit strange. I started trawling the internet for inspiration & pretty much fell in love with a log burner lookalike from Dimplex called the ‘Sunningdale’ which you can find info on here. This bad boy is SO realistic that it takes away the stigma behind electric fires. It has a HD TV at the back which you turn on & gives off ‘flames’….but the part that really drew me in was the fact that it crackles just like a real fire & you can turn the sound up/down.
I would have that roaring, crackling fire without the maintenance or safety implications that come with it!
First things first, I found a local carpenter & general all round DIY god in Matt (you can find him on Checkatrade here) who listened to my vision & managed to squeeze me in to do it the very next day…because lets face it, patience is not my forte.
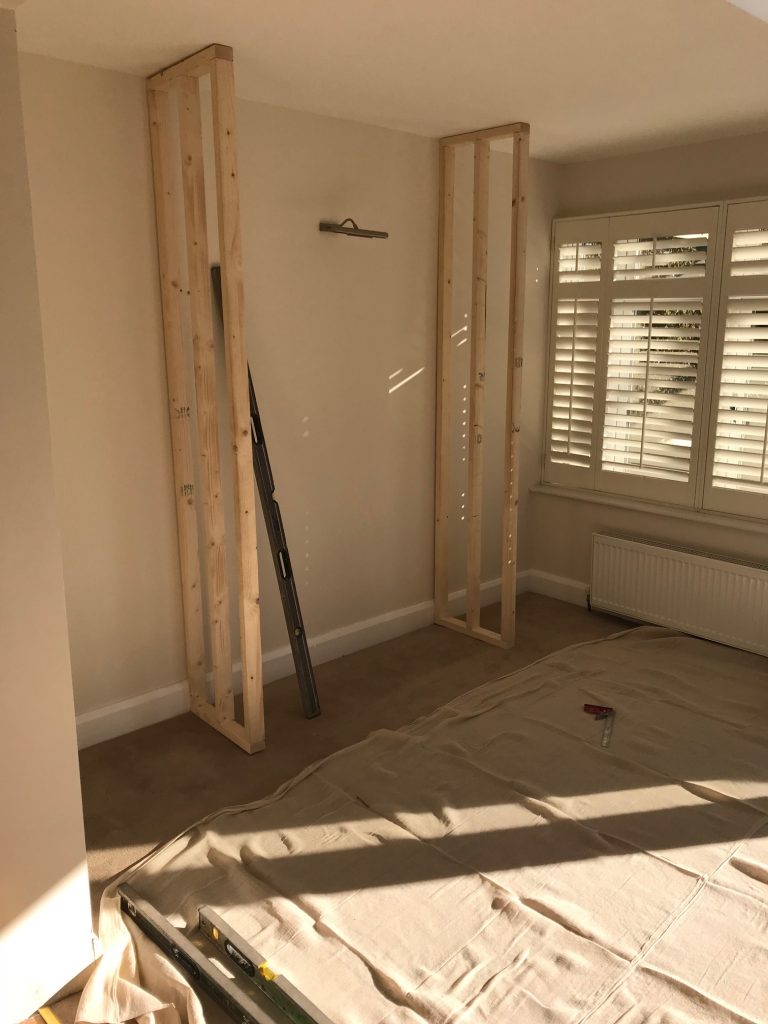
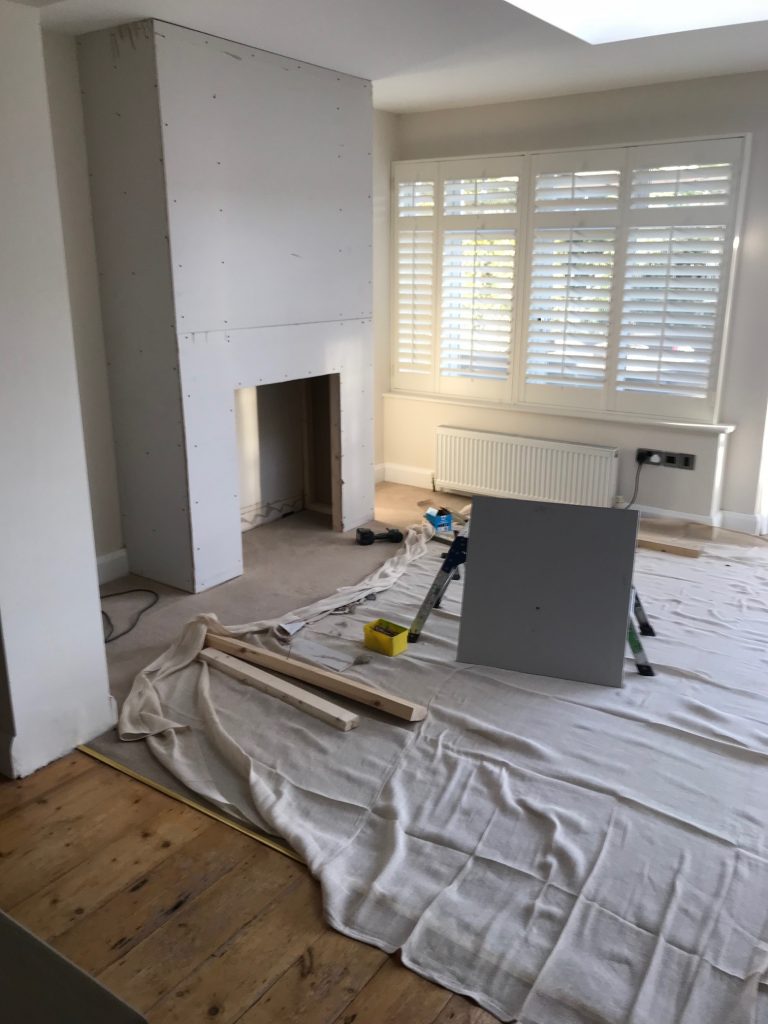
Here’s some before images –
He started by building the stud wall to house the stove. This was literally a frame of wooden beams with plasterboard attached. Obviously if you install a real log burner you have to follow fire safety guidelines like having special heat boards.

As we only had the measurements of the stove, he used a spare bit of plasterboard cut to size so we could work out how big to make the opening. This was then cut out taking into consideration allowing some room for the hearth which would add to the height.

Next up was making a bespoke fire surround – I used Pinterest for some inspiration here. I did try looking for one online but found it impossible to find one that I liked thats internal fit the hole, plus it actually ended up cheaper doing it this way.
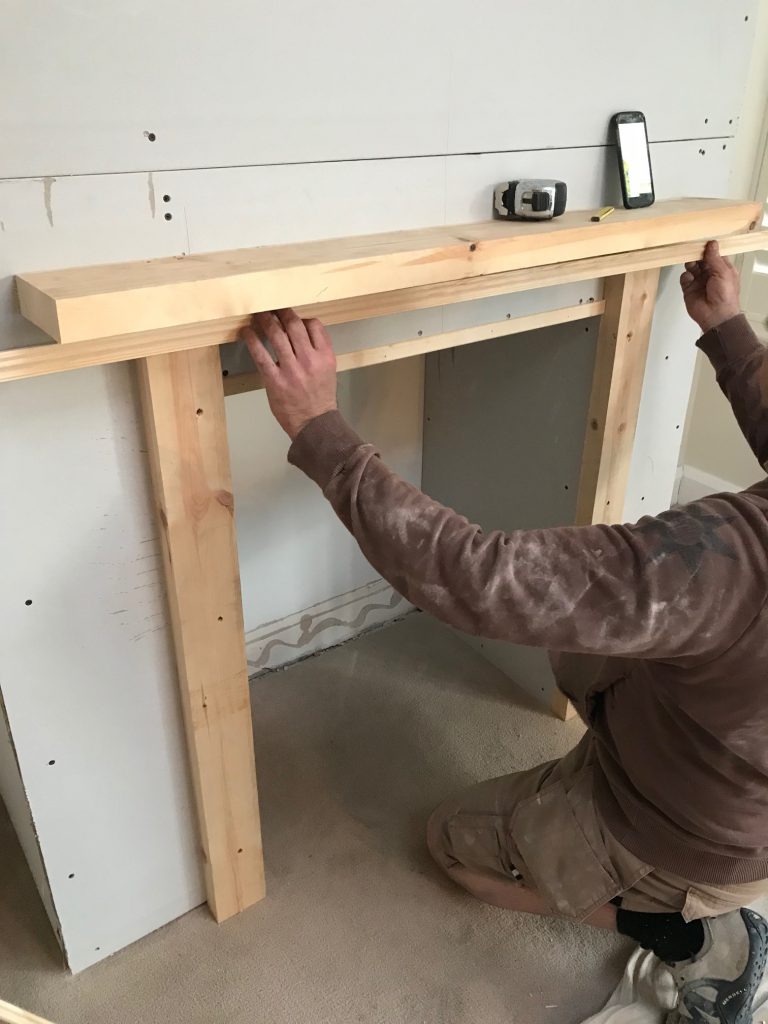
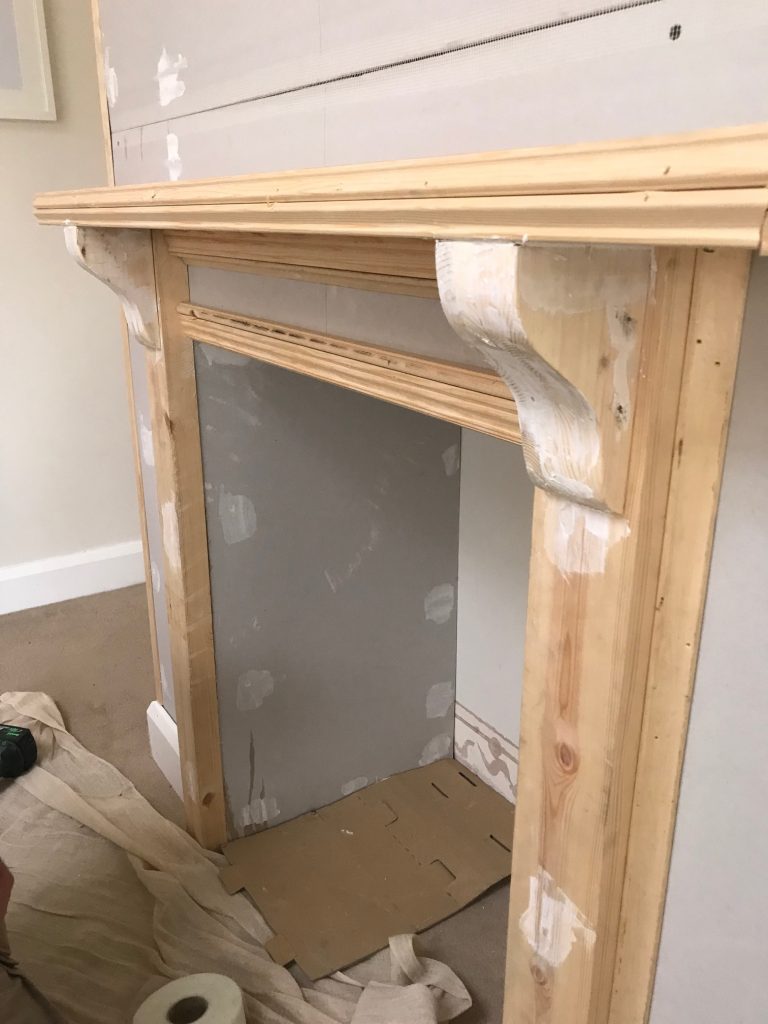
Matt used timber & some trim to craft the kind of look I wanted to go for including some DIY corbels by cutting 8x bits of wood using a template & glueing together then filling/sanding.
I got to work filling, sanding, priming, undercoating then painting the fireplace ready for the stove to arrive.
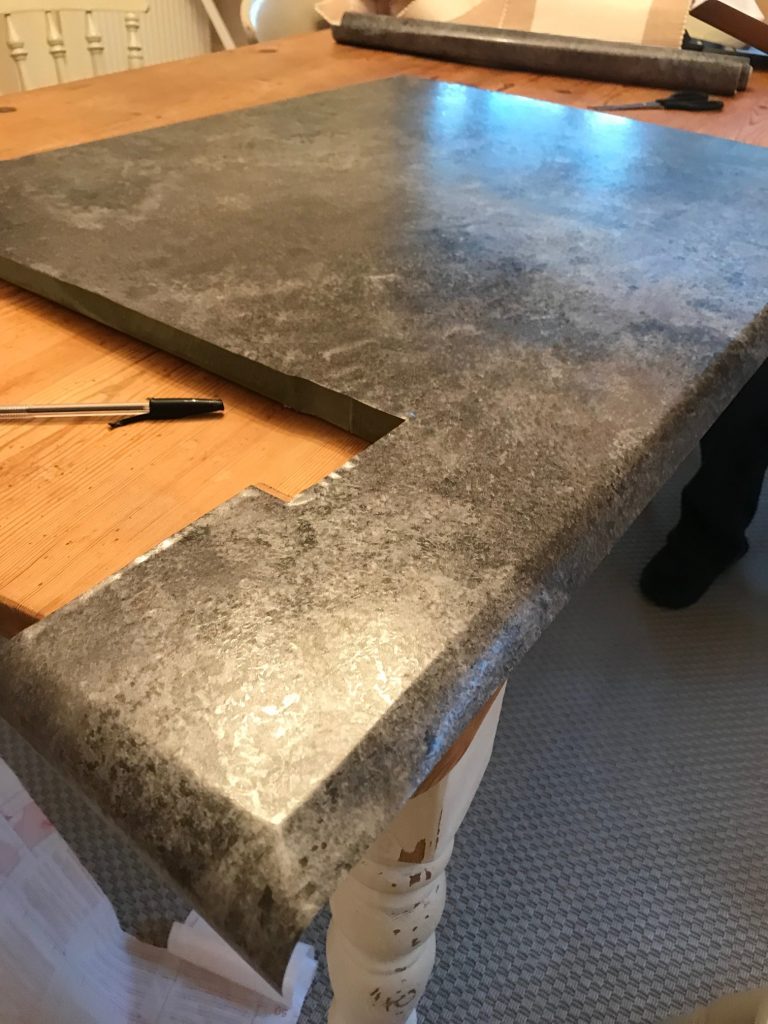
One of the problems that we faced was what to use for a hearth. I knew I wanted a slate look but couldn’t find any tiles large enough & also the cut was tricky because I wanted it to go around the custom surround. After contacting several places was quoted £120+ to be cut to the specific size but luckily my lovely mum is a genius & came up with the idea of cutting a piece of fire resisitant MDF & I remembered about how people on a Facebook ‘DIY on a budget’ group I follow are always using Fabalon (aka sticky back plastic) to give their kitchen worktops a new look.
We didn’t know if it was going to work but the MDF was an off piece & the Fabalon (which you can find here or from Wilko’s, it’s heat resistant up to 75 degrees) meant that it cost under £10 to make! I was surprised at how easy it was to fit on to the MDF, using a credit card to get out the air bubbles is definitely key. Obviously if you are putting in a real log burner then this wouldn’t be an option due to the intense heat so you’d need real stone.
For that real log burner look I ordered a bit of flue pipe off Ebay which I cut to size & popped in.
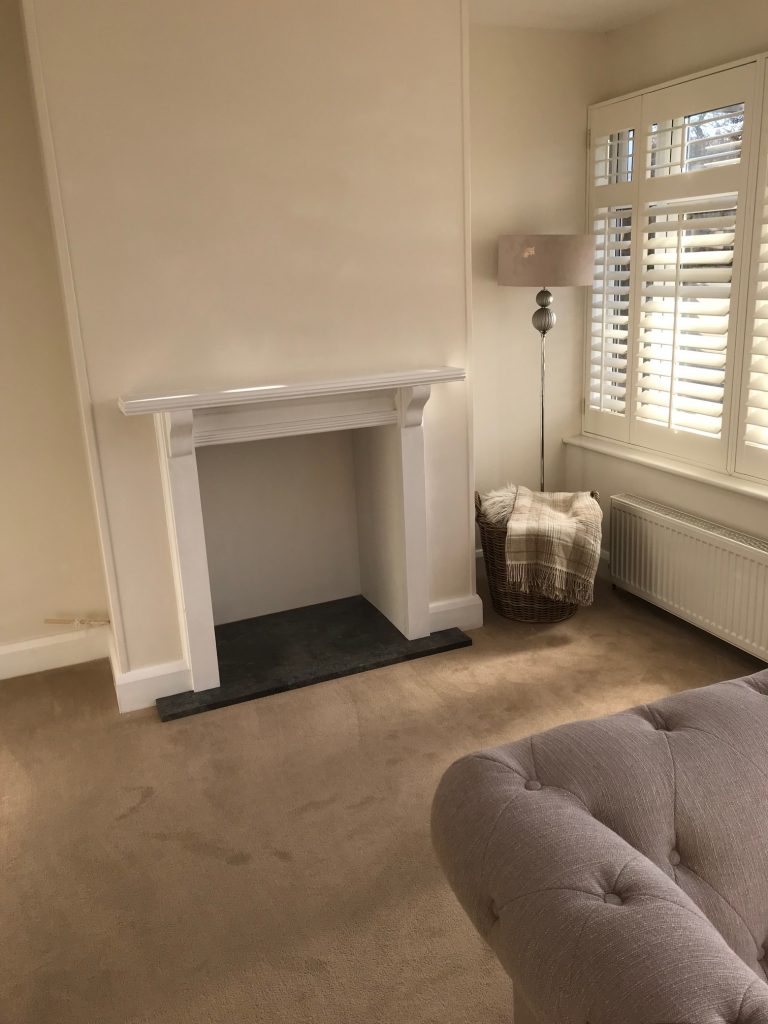
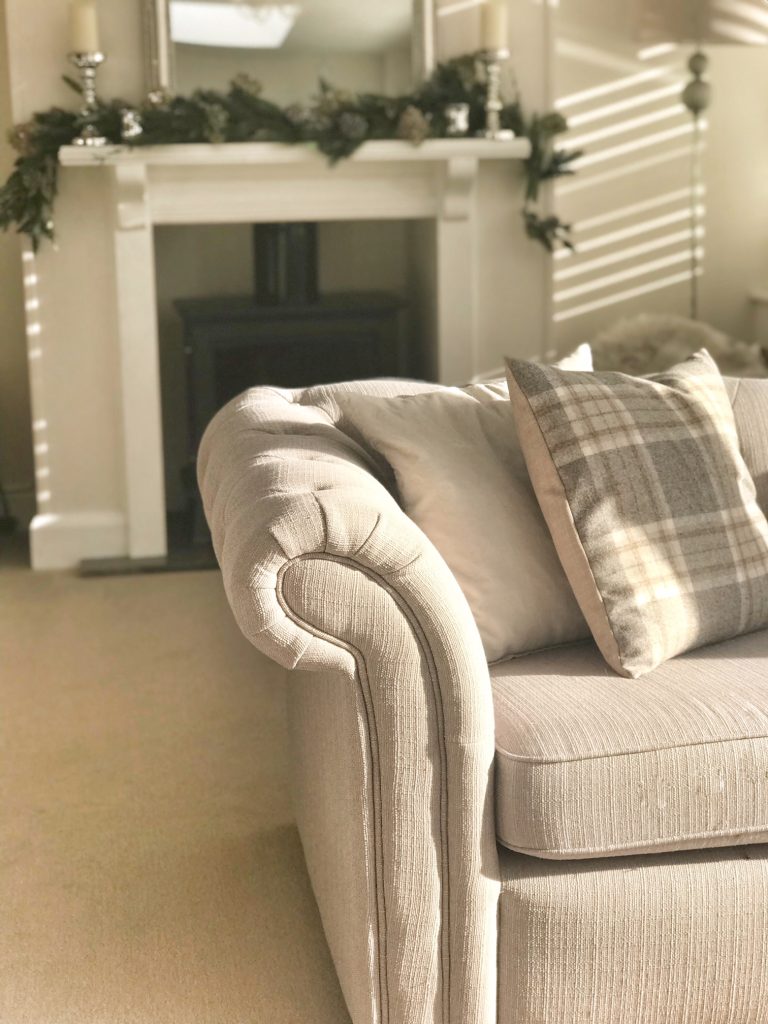
Below is the finished result! Finished just in time to create the most cosy Christmas at Baylyn House & I am SO in love. It’s completely transformed the room & creates such a lovely atmosphere.
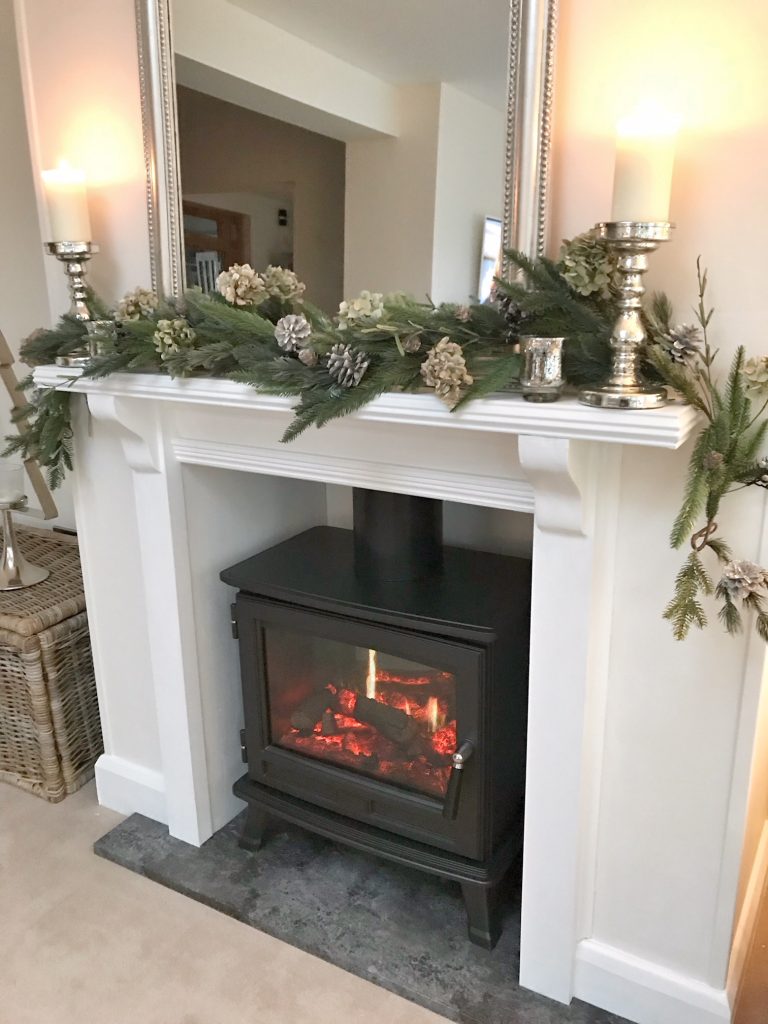
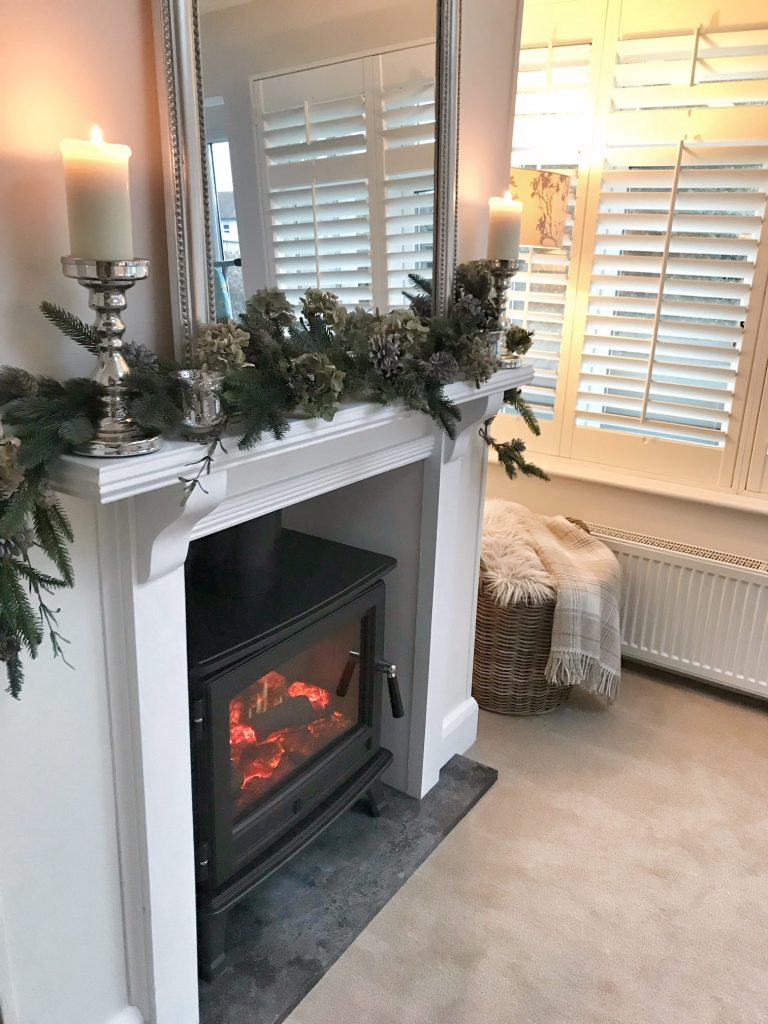
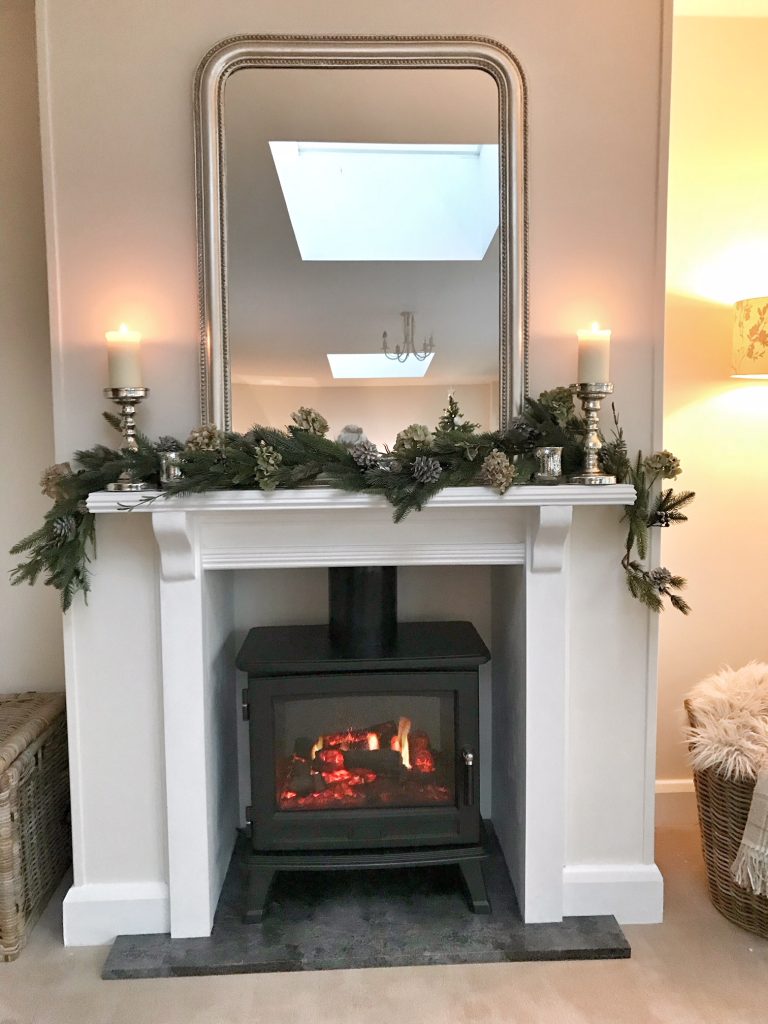
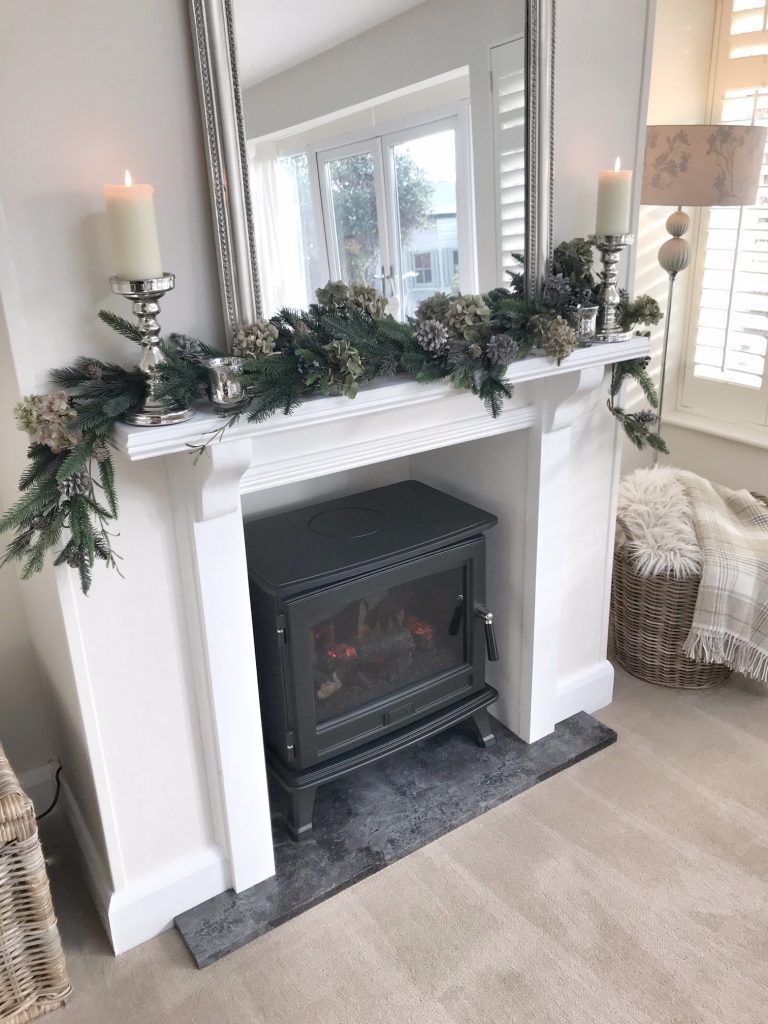
To create the finished look I went for this mirror (silver – 101.6cm x 76.2cm) then added these gorgeous crackled silver effect candle holders either side from The White Company. To add that Christmas magic (& so Father Christmas definitely comes down the new chimney…even if it is stud wall) I bought this ‘Rosemary & Pinecone’ garland from The White Company which again is super realistic & decided to add some dried hydrangeas (which you can read about how to do on my tutorial blog post here) to bulk it out slightly & add a bit of ‘something’ extra special.

I’m teaming up with Dimplex tomorrow from 5pm this evening (5th December 2017) Instagram account to host an incredible giveaway of one of their ‘Grand Noir RTOPSTV20GN‘ Opti-Myst stoves worth £649.99 over on my Instagram feed. This stunning stove is in a glossy black finish to add a real statement in any room, with the look and feel of a real log burner, but none of the fuss or mess. Incorporating Dimplex’s patented Opti-myst 3D flame and water generated smoke effect for that realistic look. This lets off a steam effect (which is actually cold vapour so safe for young children) which is water generated rather than having the HD TV behind.
Love,
*Some of the items in this post have been gifted to me for the purpose of this project
Hi Charlotte, I think this looks absolutely fabulous- what a great to add character!
Can I ask how much you would expect the whole project to cost? I am thinking of doing something very similar and wondered what to budget?
Thank you, Lauren x
Hi Lauren, it depends on if you do the stud work yourself really…we paid £500 for the stud wall & bespoke surround from Matt the carpenter then £15 for the hearth & used leftover paint then obviously the stove on top. Hope that gives you a rough idea x
Look all snuggly lovely ?
Amazing! So beautiful! We have been looking all over for a great realistic stove! Think is definitely on our wish list for the new year! Xxx
OMG Charlotte, when you set your mind to something it happens and boy what a gorgeous addition to your beautiful room, its perfect and the icing on top of the cake!! What a brilliant time of the year to show off such a stunning and incredible realistic log burner!!!! Everything you ‘showcase’ now, in the past ( followed your garden project) and in the future are all so successful ? Well done for putting a smile on my face everyday and I enjoy seeing what you are up to each and every day- Enjoy and Merry Christmas – I wish and keep my fingers crossed for that fire in my stocking this year ????xxxx
Hi Charlotte,
Absolutely love what you have done. I am looking to change my existing fireplace but am lacking in ideas, do you know of any pages/places I could submit photos to for people to comment and give me ideas?
I already have my husband looking for “fake flu” ! What a brilliant idea!
Love
Lucy x
Stunning Charlotte! I’m desperate for one of these stoves as we are totally priced out of a real wood burner and I don’t fancy the spiders contained in a wood store. Well done on thi, it really is lovely. Thanks for sharing x
Hi Charlotte
I’m really sorry if this isn’t where I’m supposed to make the comment lol I’m a bit hopeless on here lol x you have made the most beautiful job of your fireplace and the fire is stunning truly stunning x we would love the opportunity to win one for our home so I apologise if I have commented in the wrong place my son says I’m hopeless ? many thanks jaynie dale xxxx
Looks truly amazing! X
Hi Charlotte
This is genius!! What a brilliant idea and it looks fabulous! I had thought from your instastories the log burner was real!! I am very inspired!
Vicky x
Love love love this. I really want to do the something similar. Just one question (sorry if it’s a stupid one!) Did you plaster this? I always thought that plaster took ages to dry out but this seemed to be finished so quickly x
No it wasn’t – it was just edged & then filled/sanded/prepped! We got away with it but usually you’d have to have it plastered x
I looks beautiful ! Thank you for showing us how it’s done ???
What a Beautiful corner you have have created..I’ve been looking to do the same, your passion to making ideas come to life is a real inspiration..if I may ask what are the measurements of your faux Chimney? Would be a great help thank you…so…difficult to decide. Xx
I absolutely love this! We live in a 1970’s style property which has no chimney so don’t have that chimney breast feature in the front room. We’ve lived here 2 years now and everyday it bothers me but seeing this and the lovely Vickie’s transformation have given some fab inspiration! Xx
Hi Charlotte quick question regarding the gorgeous new fireplace you’ve had installed. Did your builder do a full skim with plaster or just over the joins and screw holes?? We are also doing a fireplace ourselves and just wanted some Info.
Many thanks Emma
Hi Emma, no he didn’t, we just filled & decorators caulk 🙂 it does depend though…sometimes it needs plastering! xx
HI Charlotte,
Love this fireplace, it looks amazing!
The basket to the right, is that the Laura Ashley ones tagged?
Many thanks,
Jessica
Hi Jessica, my one was from a little local shop near me but the Laura Ashley ones are basically the same! xx
Also, can I ask how you fixed the fake flue to the top of the stove and what th join looks like?
Thank you
The top of the stove has an indent which it sort of sits in to – we haven’t attached it as you can’t see the join or the top unless you properly stick your head in & under the mantle x
I’ve read this post a few times now and love seeing your fireplace and burner come to life. It’s just perfect… wishing you many a happy hour or two reading by the fire xx
Thank you so much Linda – I’m SO pleased with it x
Hi Charlotte, what a truly amazing room design. We loved it so much we decided to do the same in our lounge. We are struggling to find a fake flue for the fire, where on eBay did you find yours? We are desperate to finish ours to the same very high standard as yours. Thank you so much
Hi Paul, it’s actually a bit of plastic drain pipe we cut to size! Much cheaper x
Hi Charlotte, thanks for the detailed post on your fireplace. Has given us so many ideas will definitely be doing our own fireplace now, we just needed some inspiration. Wondering would you be able to tell us the width of the chimney breast and the opening of the fireplace? Many thanks, Jenny
Hi Charlotte,
I love what you have done and we are looking into doing this in our new build victorian style home. Can I ask how you hid the electrical plug for the stove?
Wishing you a lovely Christmas in your lovely home. What you do is truly inspirational!
Best wishes,
Charlotte Smith
We have the exact same question! Would love to know how you hid the electrical plug?
Thanks!
Hi
This is exactly what I am wanting to do in my lounge. I will be wanting to hang a mirror above. Was that easy enough to do and was the wall strong enough to hold a mirror.
Thanks Karen
This is beautiful!!! The dimensions would be incredibly helpful. Also the measurements of the space for the log burner.
Many thanks Jemma
Love it! I would like to know if you fitted over carpet or did you cut carpet to fit around? Thankyou